Quicken Product Highlights February 2021
Windows Product Highlight – Savings Goals
This month, the Quicken team would like to show you our Savings Goals feature. When most people use the Planning tab in Quicken, they concentrate on the Budgets section. Another valuable tool on that tab is the Savings Goals section. If you haven’t created a Savings Goal yet, you’ll see a blue Get Started button. Select Get Started to bring up the Create New Savings Goal screen.
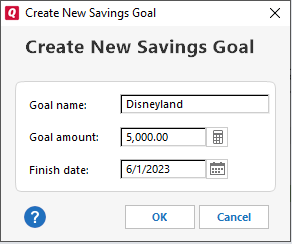
The Create New Savings Goal screen is very straightforward. You enter your Goal name, Goal amount, and Finish date. Take a little time to think about what your goal is, and especially the end date. When do you want, or need, to have the money saved by? Some goals have specific deadlines while others can be more flexible. Once you’ve set your initial goal, you can always adjust your goal later, especially once you see the monthly contribution amount and determined how achievable that goal is.
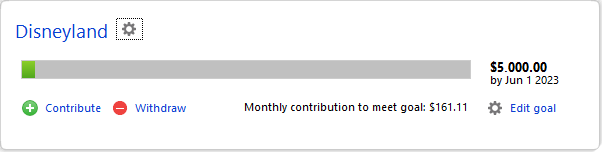
Once you have entered your goal, you’ll see a screen that gives you information about the goal. When you set aside money toward your goal, select Contribute to add that money toward your total. If you need to withdraw money (hopefully only at the end) then select Withdraw.
You contribute to a savings goal by transferring money from a bank account (usually a checking or savings account) to your savings goal account. The ending balance of your bank account appears to be reduced by the amount you contribute.
Remember that in this case the ending balance isn’t the true balance of your account, because the savings goal money never really leaves your account. The savings goal account will appear on your account bar with the amount you have saved. What you are really doing is hiding that money in plain sight. It is still in your account, but it is tracked as part of your savings goal balance. For example, if your bank account has $5000 in it, but you have contributed $2000 toward your savings goal, then you would see $3000 in your bank account and $2000 in your savings goal account.
As you get closer to your goal, you’ll see a the gray tracking bar turn to green. You’ll also see an adjustment to your monthly contribution amount, as it recalculates based on what you have contributed so far. The more money you add early, the less the monthly amount will be. If you miss a contribution or can’t contribute as much as the suggested amount, then the monthly payment amount will increase.
If your goal changes, click Edit goal. If you no longer need that goal click the gear icon and select Delete. Remember that your savings goal is based on what you designate as contributed. The best way to save the actual money is to use a separate savings account or a cash system so that the money is kept outside of your standard spending accounts. If you want to set aside money on a specific date each month, create a reminder under Bills & Income. Simply make the recipient the name of your Savings Goal.
Your Savings Goals are listed on your Account Bar so you can track them at a glance.
Mac Product Highlight – Reconciliation History and Re-Reconcile
This month, the Quicken team is excited to share our new Reconciliation History and Re-Reconcile tools that will come out with the v6.1 product release. The new Reconciliation History feature in Quicken for Mac allows you to review past reconcile attempts so that you can identify the source of a discrepancy in the past and fix it. Before Reconciliation History, tracking down errant transactions could be a time-consuming process. Now, we make it easy to get a list of past sessions and review the data from the original reconciliation.

To use this feature, go to your Accounts menu and select Reconciliation History. The Reconciliation History screen will show your past reconciliations. This makes it easy to spot past discrepancies, which are called out in the Discrepancy column.
If a past reconciliation ended with a discrepancy, you can select the Re-Reconcile button at the bottom of the screen to run reconciliation again. When you select Re-Reconcile, the Re-Reconcile screen appears. Select a reconciliation that you want to correct. You also have the option edit the ending balance of a reconciliation to reflect the corrected balance.
Once you have chosen a reconciliation to correct, select Next. The Re-Reconcile screen displays the difference between the Reconciliation Ending Balance and the Quicken Balance. You will also see a list of your transactions. You can review those transactions and make any necessary adjustments. Once you have made your changes, select Finish.
Quicken has made the material on this blog available for informational purposes only. Use of this website constitutes agreement to our Terms of Use and Privacy Policy. Quicken does not offer advisory or brokerage services, does not recommend the purchase or sale of any particular securities or other investments, and does not offer tax advice. For any such advice, please consult a professional.


