The Complete Guide to Getting Started with Quicken for Mac
Thank you for choosing Quicken for Mac!
If this is the first time you are using Quicken, Quicken guides you through setting up your Quicken ID, adding your bank accounts and downloading your transactions
Installing the App
You will see the Install Quicken screen when you put in the CD or double click on the downloaded file.
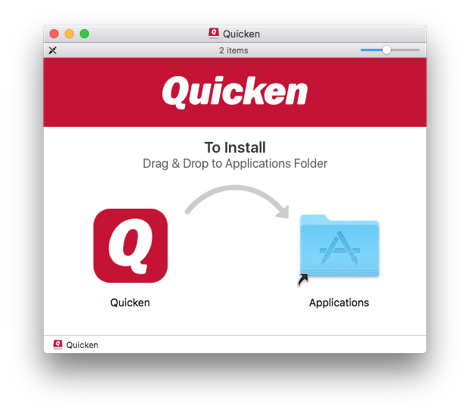
CD
Drag Quicken to the Applications folder as instructed.
Download (DMG File)
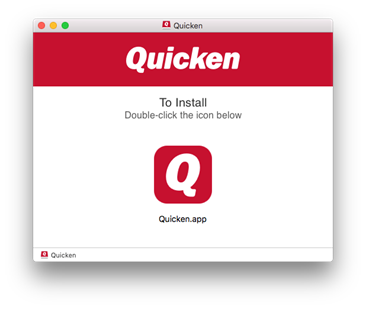
Double click on the Quicken icon to install the application.
Once installed, click the Quicken icon in your Applications folder to launch the program. Quicken will automatically download and update to the latest version of the application.
Activate your Quicken Membership
Purchases from Quicken.com
When you purchase a Quicken subscription from Quicken.com, your purchase requires that you create a Quicken ID, or use your existing Quicken ID. This Quicken ID is associated with your subscription membership, so you’ll use this ID to activate Quicken.

After you sign in with your Quicken ID, your membership is activated.
Purchases from a retailer (not Quicken.com) – a boxed version or download
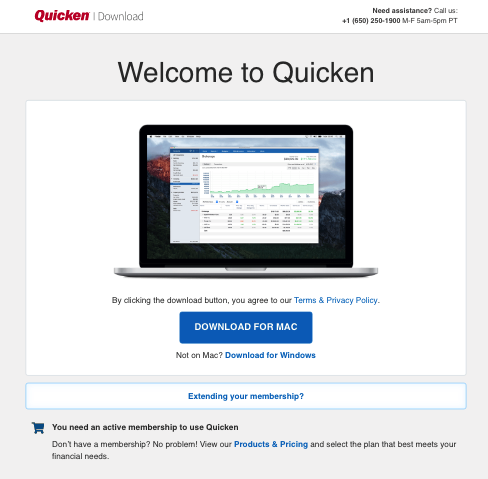
- Click Download for Mac to begin the installation
- After installation, sign in or create your Quicken ID to setup your profile.
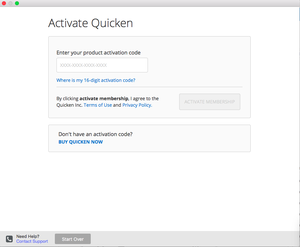
- When prompted, follow the on-screen instructions to enter your 16-digit activation code.
Upgrading from Quicken for Mac 2015, 2016, or 2017
If you just upgraded to the new release of Quicken from a 2015, 2016, or 2017 version, Quicken will automatically find and convert your existing Quicken file.
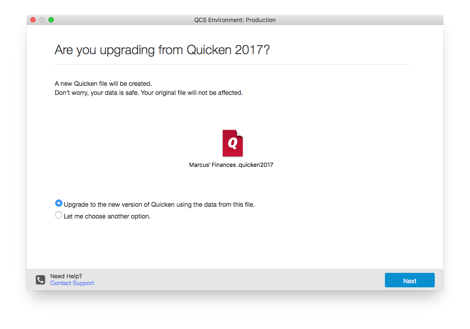
- Select Upgrade to the new version of Quicken using the data from this file and click Next to start using the file.
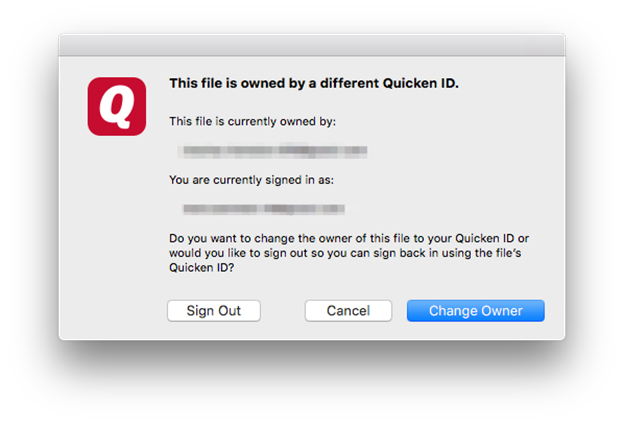
NOTE: If the Quicken ID associated with your existing file is different than the Quicken ID you just registered your Quicken membership with, you will be asked if you want to Open and Change the Owner of the file. If you do this, you will need to reactivate your accounts for online banking (your online banking passwords are removed for security purposes).
New User or Upgrading from Quicken for Windows, Quicken for Mac 2007, or from a different personal finance product
After you’ve signed in and/or activated your membership, you’ll see a screen that asks what you’d like to do next.
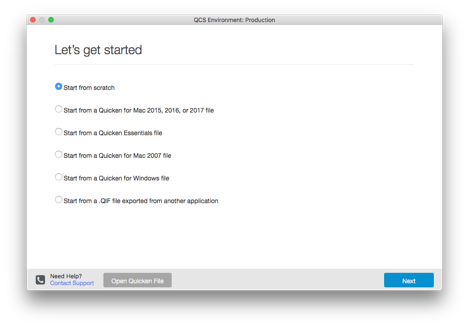
Start from a Quicken for Mac 2018 and Newer file
- There is no file conversion process required to open a Quicken for Mac 2018 or newer file.
- If the file doesn’t automatically open, click on the Open Quicken File button at the bottom of the screen.
- Find your file and open it.
Start from scratch
- Select Start from scratch.
- Choose sync your data to the cloud to use the Quicken mobile app. Make your selection and click Next.
- After these steps you’ll be asked to add an account. Quicken automatically downloads your transactions from bank and other financial accounts. It’s good to add at least a checking account and all of your credit cards.
- After this you’ll see the Home tab which will suggest the other benefits of Quicken.
Start from a Quicken for Mac 2015, 2016, or 2017 file
- Select Start from a Quicken for Mac 2015, 2016, or 2017 file.
- Select a file to open.
- Choose sync your data to the cloud to use the Quicken mobile app. Make your selection and click Next.
- After these steps you’ll be asked to add an account. Quicken automatically downloads your transactions from bank and other financial accounts. It’s good to add at least a checking account and all of your credit cards.
- After this you’ll see the Home tab which will suggest the other benefits of Quicken.
Start from a Quicken Essentials file
- Select Start from a Quicken Essentials File.
- Select the Quicken Essentials file you’d like to open.
- Choose sync your data to the cloud to use the Quicken mobile app. Make your selection and click Next.
- After these steps, you’ll need reconnect your accounts. Click on account settings to figure out which accounts to reconnect.
Start from a Quicken for Mac 2007 file
- Select Start from a Quicken for Mac 2007 File
- Select the Quicken Mac 2007 file you’d like to open.
- Choose sync your data to the cloud to use the Quicken mobile app. Make your selection and click Next.
- After these steps you’ll be asked to reconnect your accounts. Follow the steps.
Start from a Quicken Windows file
- Select Start from a Quicken Windows File
- Select the Quicken Windows file you’d like to convert.
- Choose sync your data to the cloud to use the Quicken mobile app. Make your selection and click Next.
- After these steps you’ll be asked to reconnect your accounts. Follow the steps.
Start from a .QIF file exported from another application
Disclaimer
Quicken has no control over the data that is exported from other personal finance applications. As such, our import is only as good as the exported data provided in the .QIF file.
We want to make the transition to Quicken easy, and have put a great deal of effort into handling issues related to missing or incorrect data that is imported from other personal finance applications.
However, we have found gaps or missing data in these exported .QIF files, especially with investing transactions. As a result, some data clean up may be required after your data is imported into Quicken.
Note: Personal finance applications other than Banktivity and Moneydance have not been tested for import in Quicken Mac.
Quicken supports data import from other personal finance applications such as Banktivity and Moneydance. For this, you need to first export data from the other applications into a .QIF file and then import the .QIF file into Quicken for Mac.
Export data from Banktivity to a .QIF file
- Open your Moneydance application. Select File > Export.
- On the Export Date window, select Format: QIF and date: All Dates.
- Save the newly created QIF file and exit Moneydance.
Import an exported .QIF file into Quicken for Mac 2017
- Open Quicken for Mac.
- Select File > New to start a new data file. The Let’s Get Started window is displayed.
- Select the option Start from a .QIF file exported from another application.
- Click Next. The Import data from another application window is displayed.
- Follow the on-screen instructions and import the .QIF file into Quicken.
- Choose sync your data to the cloud to use the Quicken mobile app. Make your selection and click Next.
- After these steps, you’ll need reconnect your accounts. Click on account settings to figure out which accounts to reconnect.
Quicken has made the material on this blog available for informational purposes only. Use of this website constitutes agreement to our Terms of Use and Privacy Policy. Quicken does not offer advisory or brokerage services, does not recommend the purchase or sale of any particular securities or other investments, and does not offer tax advice. For any such advice, please consult a professional.


