There are a few possible causes of duplicate transactions. You can attempt the steps provided below to resolve this issue, otherwise you can restore a backup from before the start of the issue. For steps to restore a backup, click here. You can also contact Quicken Support for assistance.
To resolve the issue, we'll first need to determine what's causing these duplicates by looking at the Downloaded ID for these transactions:
Step 1: Add the Downloaded ID column to your register
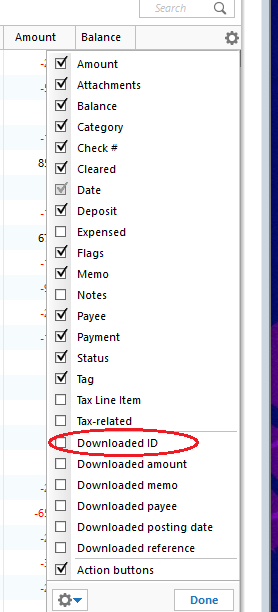
- Click on the Register Columns gear icon at the top right of the account register.
- Place a checkmark next to Downloaded ID, then click Done. (If you use Two-Line Display, you will need to select Downloaded ID and Downloaded reference)

- Review the Downloaded ID. This is the unique identifier for each downloaded transaction. It is used by Quicken to determine which transactions have been downloaded and which ones need to be downloaded.
Step 2: Determine which of the following situations is causing duplicate transactions
Mismatched manual and downloaded transactions appear in the account register.
If the duplicate and manual transactions do not have a Downloaded ID, then the downloaded transaction was not properly matched to the manual entry.
Solution: Delete the manual entry.
- Right-click the manual entry.
- Select Delete.
- Confirm by clicking Yes.
Downloaded transaction appears twice, with the same Downloaded ID.
Solution: Set the register for the affected account to Single-line display.
- Press Ctrl + 2 on your keyboard.
- Delete the duplicate transactions.
- Set the register back to Two-line display by pressing Ctrl+2 again.
Downloaded transactions appear twice, with different Downloaded IDs.
If your bank and/or their service provider is making changes to how they present data to Quicken, there is the possibility that they may transmit the same transaction with two different IDs.
Solution: Contact the Online Banking Support for your bank (Tools menu > Online Center > Contact Info) to request they escalate to their OFX team or service provider in order to resolve this issue for all their Quicken customers.
Transactions are downloaded through Quicken AND a manual download from your bank's website, resulting in different Downloaded ID numbers and duplicate data.
Solution: Don't mix your methods for getting transactions from your bank. If you want to download from the website, try to stay with that method. If you decide later that you want Quicken to update automatically rather than manually downloading yourself (or vice versa), be aware that you may encounter duplicate transactions on that first download after the change. You will need to manually delete the duplicate transactions.
Deactivating and reactivating your account to change the connection method has caused downloaded transactions to appear again.
This is typically a one-time event; if you have not deactivated and reactivated your account in Quicken, this does not apply to you.
Transfers are appearing twice.
This occurs when a transfer is downloaded for one account then downloads again for the other account and the transfer transactions do not get matched to each other.
If you find that this is not a one-time event
If duplicates continue to download, you may require the assistance from either the Online Banking Support for your bank or from Quicken Support.
To delete multiple duplicate transactions
If you need to delete numerous duplicate transactions, follow the steps below. Please note, multiple transactions can only be deleted simultaneously in the register. This process cannot be completed in the Compare to Register at the bottom of the Quicken window.
- Make a backup of your data file. This ensures that you have a "fall-back" file you can use to get back to where you were when you started.
- Select the affected account to view the register.
- Click the first duplicate transaction to highlight it.
- While holding the Ctrl key on your keyboard, click each of the duplicate transactions in the register.
- Once all the duplicate transactions are selected, right-click on any one of them and select Delete.
