 Windows
 Mac
MacOverview
When you back up your Quicken data, you preserve your financial information (including reports, passwords, accounts, and attachments). This is a way to safeguard your records in case of a computer mishap or as a way to move your data from one computer to another.
Please note, a Quicken data file has the extension .QDF while a Quicken backup file has the extension .QDF-Backup (or quicken.backup in Mac).
Important: Quicken Cloud
Syncing to the
Back up in Quicken for Windows
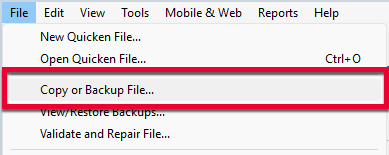
1. Select File > Copy or Backup File...

How can we help?
✖Still need help? Contact Us
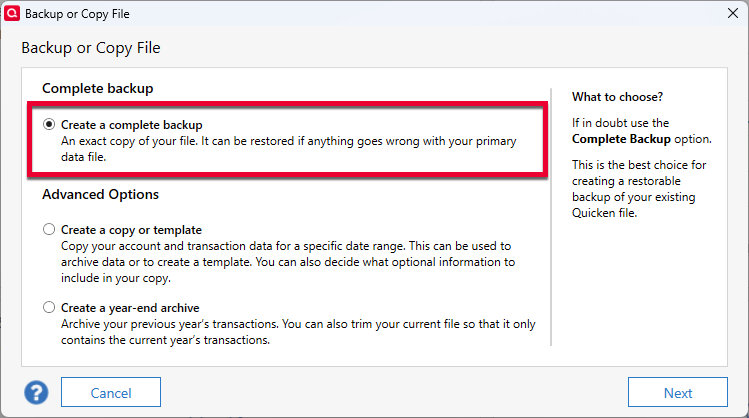
2. Select Create a complete backup and click Next.

How can we help?
✖Still need help? Contact Us
3. To make it easier to identify your latest backup, you can put a check next to Add date to backup file name.
4. Quicken will show you the location where your backup will be saved along with the name of the backup file (this is typically your Quicken file name followed by .QDF-backup).
The default save location for backup files is C:\Users\[your name]\Documents\Quicken\BACKUP and we recommend to leave this unchanged.
If you need to change this location, click Change... then select a folder to save the backup to. After making your selection, click Save.
5. Click Create Backup.
Back up to a USB thumb drive, CD, DVD, etc.
1. Insert the CD/DVD or attach the flash drive you want to use for your backup.
2. Open Quicken.
3. Select File > Copy or Backup File...

How can we help?
✖Still need help? Contact Us
4. Select Create a complete backup and click Next.
5. Quicken will show you the location where your backup will be saved along with the name of the backup file (this is typically your Quicken file name followed by .QDF-backup). Click Change... to select where you would like to save your backup. This is where you'll select your CD/DVD drive or flash drive.
6. Click Create Backup.
Restore Quicken data
Go to File > View/Restore Backups....
Browse the Local and Online Backups tabs to find the backup file you want to restore. The Quicken backup file has the extension .QDF-Backup.
Select the file to restore and click Restore Backup.
Next, you will be given the option to overwrite the file you have open or to create a copy of the backup you're restoring.
If you Create a copy, you will need to select a location to save the copy to and you will also need to give the copy a unique file name. After naming the file and selecting the location, click Save, then click Yes to open the restored file.
If you are restoring a file over the current file, click OK to overwrite the current file then click Yes to open the restored file.
What does it mean to overwrite a file?: Restoring a backup file replaces your current data with the data stored on the backup. Be aware that you'll lose any changes you made since the backup was created. If you want to preserve the current file, you must rename the current file or the file you are restoring. We recommend to avoid overwriting files.
Restore an automatic backup
Quicken creates a copy of your data every seven days and stores five of these copies in a BACKUP folder. If the backup file you've created becomes damaged, you may be able to restore an automatic backup and save yourself the need to reenter data.
First, check to see if automatic backups are turned on (this is on by default)
In Quicken, go to Edit > Preferences.
Under Setup on the left, choose Backup.
Make sure there is a check mark next to Automatic Backups.
To the right of Automatic Backups, there is an Open/Change backup directory link that goes directly to your BACKUP folder - a good way of finding them fast!
Choose to back up your Quicken data file after running Quicken X times (between 1 - 99).
Choose how many backup data files you would like to save (between 1 - 99 copies).
Then, restore the automatic backup
Go to File > View/Restore Backups....
Select the file to restore.
Click Restore Backup.
Next, you will be given the option to overwrite the file you have open or to create a copy of the backup you're restoring.
If you Create a copy, you will need to select a location to save the copy to and you will also need to give the copy a unique file name. After naming the file and selecting the location, click Save, then click Yes to open the restored file.
If you are restoring a file over the current file, click OK to overwrite the current file then click Yes to open the restored file.
What does it mean to overwrite a file?: Restoring a backup file replaces your current data with the data stored on the backup. Be aware that you'll lose any changes you made since the backup was created. If you want to preserve the current file, you must rename the current file or the file you are restoring. We recommend to avoid overwriting files.
Back up and Restore using Quicken Online Backup
For more information about the Quicken Online Backup service,
Back up and Restore using Dropbox
For backup instructions, see
For information on restoring data using Dropbox, see
Troubleshooting
If you restore and open a backup file and the file is empty, you may have opened the wrong file. For help locating Quicken files,
click here .In order to move a backup file from Quicken for Mac to Quicken for Windows (or vice versa), you will first need to restore the backup file in the original program then convert it to the new one. For conversion steps,
click here .If you receive a "File not backed up" error,
click here .After restoring a data file, you may be asked for a data file password. For more information about data file passwords,
click here .
Overview
When you back up your Quicken data, you preserve your financial information (including reports, passwords, accounts, and attachments). This is a way to safeguard your records in case of a computer mishap or as a way to move your data from one computer to another.
Please note, a Quicken data file has the extension .QDF while a Quicken backup file has the extension .QDF-Backup (or quicken.backup in Mac).
Important: Quicken Cloud
Syncing to the
Back up in Quicken for Mac
Select File > Save a Backup...
Choose a place on your Mac to save the file.
Click Save Backup. The Quicken backup file will have the extension .quicken2017backup or .quickenbackup.
Back up to a USB thumb drive, CD, DVD, etc.
Select File > Save a Backup...
Choose a place on your Mac to save the file. You can save to a flash drive by clicking Where: Backups and navigating to the device you want to use.
Click Save Backup and you're done!
Restore Quicken data
In Quicken, select File > View/Restore Backups...
Browse your computer or external media to find the backup file you want to restore. The Quicken backup file has the extension .quicken2017backup or .quickenbackup.
Select the file to restore.
Click Choose.
Restore an automatic backup
Quicken creates a copy of your data every time you close the program and stores five of these copies in a BACKUP folder. If the backup file you've created becomes damaged, you may be able to restore an automatic backup and save yourself the need to reenter data.
First, check to see if automatic backups are turned on (this is on by default)
In Quicken, select Quicken > Settings.
Go to the Backup tab.
In the Local backups section, make sure there is a check mark next to Automatically create a local backup when quitting Quicken.
Under that option, there is a Backup Folder button that links directly to your BACKUP folder - a good way of finding them fast!
Then, restore the automatic backup
In Quicken, select File > View/Restore Backups...
Click Restore a Local Backup.
Select the Automatic Backups folder (Quicken > Backups > Automatic Backups).
Select the file to restore.
Click Choose.
Back up and Restore using Quicken Online Backup
For more information about the Quicken Online Backup service,
Back up and Restore using Dropbox
For backup instructions, see
For information on restoring data using Dropbox, see
Troubleshooting
If you restore and open a backup file and the file is empty, you may have opened the wrong file. For help locating Quicken files,
click here .In order to move a backup file from Quicken for Mac to Quicken for Windows (or vice versa), you will first need to restore the backup file in the original program then convert it to the new one. For conversion steps,
click here .After restoring a data file, you may be asked for a data file password. For more information about data file passwords,
click here .
